My Craft Room!
I'm soo proud of my little craft room!! I have had lots of creative materials for many, many moons, but I have never before had a place where I can store it all in one place and call my crafty own!
Not having a craft room has never stopped me making what ever I chose to when ever I like, But very recently I decided to swap precious clothes hanging space, for a place to work, with great lighting and everything within arms reach. I took 12 bags of clothes to the charity shop and dismantled the clothes poles for the loft.
Then A trip to Ikea was to be had!! For my birthday My lovely mum and nanny chipped in plus what I had saved and I bought my storage/work space. Within a week I had convinced my wonderful fiance to help me put it up! We did, and, it is!!
Here's a few snap shots of my tiny but perfectly formed craft room.
09 May 2013
Every girl needs to know how to make a pair of Tank girl rocket tits!
HOW TO: Tanks Girl Rocket Tits!!
Here is part of a Tank girl costume I made for a friend for Halloween. Rocket Tits! Tanks girl is famous for her huge knockers, that look like missiles and I thought, hey, I can do that!
I did look for an existing "How to" on it but came up quite short!! I did find one or two but they were not amazing, so I decided to do my own one!! Why not, after all that's what a blog is for...
Gallery's of all my old craftings
Ok so I have rounded all my pictures up and sorted them out into albums. Allot of the creative bits I have got up to over the years. Sooooo rather than post a new blog on each craft which would be rather self indulgent and pointless, I have decided to put them all in one simple post.... Here:
Note books Flowers
Teddy's Greetings cards
Jewellery Pumpkins
Cakes and Foods Scrap booking
Crin Cyberlocks Paintings
Misc crafty bits
Enjoy! :)
Note books Flowers
Teddy's Greetings cards
Jewellery Pumpkins
Cakes and Foods Scrap booking
Crin Cyberlocks Paintings
Misc crafty bits
Enjoy! :)
31 March 2013
How NOT to resin!
I'm back on the miniatures again!
Also I just wanted to mention that this resin post has been written over time, as I try new things and find it does or doesn't work. Then I post the results good or bad.
I made some tiny lil mushrooms in domes a while ago and they went down a storm, so I made some more. Then I got my hands on a massive shipment of glass bottles and vials and have been making more tiny stuff.
I will be documenting all my miniatures here as soon as I have opened my Etsy and Folksy shops. Until then it's a secret! :P
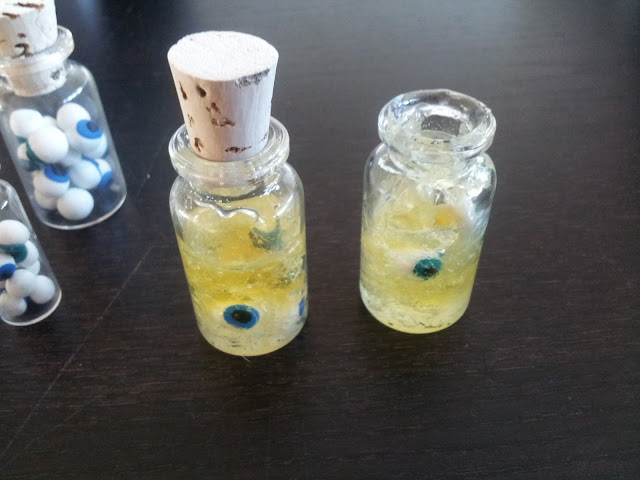
I made some mini eye balls out of air drying Fimo and polymer clay ones too and put them in the glass bottles. Then I had a brain wave, what if I added epoxy resin to the mix to create glass jars with eyeballs in but to have the look of there being liquid/juice in the jar too?
So I head off to the pound shop to buy some 2 part epoxy resin to have a go at it. How did it go?..... Well that's why I'm blogging! It went pretty badly for a first try and I now realize that you get what you pay for and there are loads of different resins out there to try, that all act slightly differently depending on what you need them to do all with different effects, viscosity and setting times. I was now in a bit over my head to be perfectly honest.
So after a bit more research I found out that I would probably need a "water clear" 2 part resin That I can get in many different places inc ebay (which is my favorite place to shop) and it's not going break the bank either! Which is always good! I haven't bought any yet, as I have asked for some advice on the craft forum I go to from those who use resin allot to see if they agree with the research I found out or can tell me the best resin to try.
Back to the pound shop stuff.....
The pound shop 2 part epoxy resin glue that I first tried, set way too quickly and had lots of bubbles and cracks in the finished product and at the end of the day dried to a lovely snot green colour. NOT what I wanted or was intending.
If I learnt anything out of this experiment, it's not to give up and some times your crafting ideas end up all trial and error to get the desired finished product.
I have taken some snap shots for your viewing pleasure of my total failure of my first attempt at this. So many craft blogs I have been to make everything look so perfect and simple to do with no mistakes. Well I have decided to post my wrong'uns here as well the perfected pieces, once I have got there, after the trials and tribulations of getting it bang on.
So here we are, the WRONG WAY TO DO THIS!!...........
I will be posting up pics when I perfect it or if I have any other total mess ups!!
I have now found out, bought and tried with a much better resin and it turned out ok, well 100 times better than this above any hoo. I'm being a bit rubbish and I have no pics yet of the better version. Although I did find out that air drying Fimo eyeballs float in resin, DOH!! So I will have to make them out of normal Fimo instead to make it work.
Note to self.... a bit of agitation goes allllong way when using resin, and I need to find a better way to measure it out too, as I ended up wasting LOADS of resin that started to cure before I used it.
I ended up making an ugly paper weight with what was left!! Yuk! (pics to come) To find out about the different types of resin go check Here it's the simplest guide I have found so far. I ended up buying 500ml Polyester resin from ebay for around £10 and it worked ok, It has a pot life of around 20-30 mins so it's just about long enough to get your stuff together pour or syringe your chosen piece!
It's now 2 months on from when I bought the "good" resin and I have had a tinker with that too now. Still not perfected embedding polymer clay into it yet, for some strange reason the polymer clay piece ends up with like an air bubble around the whole piece. Not tiny air bubbles in the resin but one big bubble around the polymer clay. It works quite well for the mermaid fetus but for the human one it looks a bit strange. I took these pics to show you but they don't look so bad through the eyes of the camera? The eyeball picture shows the same thing.
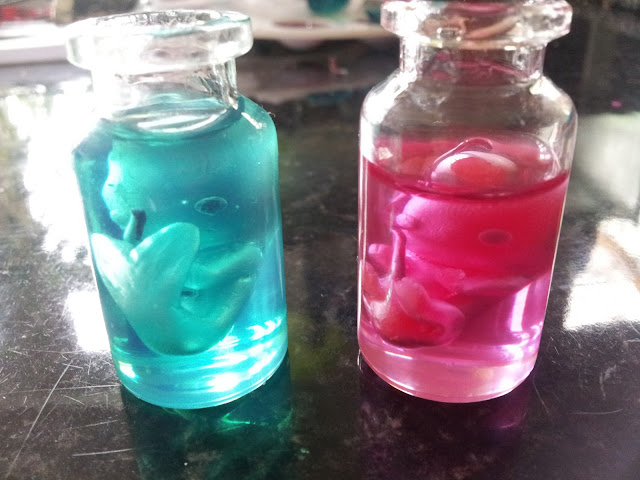
I have tried dropping the piece straight into the resin and agitating it- Nope that didn't help. I have tried dipping it in the resin before embedding it. This time trying a 2 part pour with it too. - Nope, still ended up with a bubble all around it. :/
Then after a bit more reading random resin sites I found that I could try dipping it in UNcatalyzed resin, so dip it before you put the hardener in. So I will try that next to see if that helps. If that doenst work I have 2 more things to try before I start having to ask professional resin users what this total noob is doing wrong.
I would try doing it in a 3 part pour, risky, especially if I decide to tint the resin too there's no guarantee I will get the tint the same colour as it's all guess work when it comes to adding the pigment. Oh while I'm talking about the pigment I read you should add the pigment BEFORE you add the hardener too so I will be doing that next time.
If none of that works I'm going to try another Resin to see if that will combat the air bubble problem. Maybe a different "brand" might work better??
I have some more fails to show you too. I saw on video on how to make fake opals using resin and Mylar glitter flakes. The lady in the vid used a paint pallet with the lil dips in to mix paint. So my thinking was Yay! I don't want to pay for the expensive resin molds so I'll try that. So off to the works to get some 80p paint pallets.


Boy was I wrong again! I didn't use any release agent as I didn't think I'd need any,but I should have done I couldn't get the cabochons out of the mold and I ended up breaking the pallets to get them out and when they did they were all misty/rough, not all shiny like I wanted. :(
So time to bite the bullet and buy some real resin molds. Which I did, from a very useful and very reasonably priced website you can find here. They turned up the next day. No need for release agents either, as the molds are flexible and you can pop them out just like ice out of an ice cube tray.
Finally here's a pic of something I got just right! For once I managed to pull it off without a hitch!! Can I get a woop woop!!

 I embedded watch parts and polymer clay nail art and some tiny keys and locks in these cabochons just for experimentation purposes and they worked a treat! I'm just about to run out of the resin so I think another 500ml bottle to play with it defo on the cards!!
So far I haven't had any of the "not drying/curing fully" problems that so many have had, I definitely recommend following the instructions it comes with, to the letter.
I have decided to put up a list of all the supplies I have for resin creations so you can use it as a check list if you like?
Resin 500ml
Hardener catalyst 30ml
10ml syringe (no needle)
Rubber/latex gloves.
Non stick craft sheet or plastic bag to work on.
Wooden tongue depressors for stirring
60ml measuring cups.
Toothpicks/plastic lolly pop sticks for stirring and adding pigment.
Bottle of acetone for clean up.
Bottle of Isopropyl Alcohol also for clean up.
Face mask.
Small fan (for extra ventilation in my craft room.)
Transparent Pigment 100g Magenta and Sea Green.
Molds 16 and 25 cabochons.
Very cheap tweezers to use for embedding things.
Cling film or box lid to put over your curing project.
I also have a couple of desk lamps I leave switched on the project while it's curing, for a bit of extra heat, it seems to help it cure better with the extra warmth.
After that you just need some things to embed and some time and patience.
Also I just wanted to mention that this resin post has been written over time, as I try new things and find it does or doesn't work. Then I post the results good or bad.
I made some tiny lil mushrooms in domes a while ago and they went down a storm, so I made some more. Then I got my hands on a massive shipment of glass bottles and vials and have been making more tiny stuff.
I will be documenting all my miniatures here as soon as I have opened my Etsy and Folksy shops. Until then it's a secret! :P
I made some mini eye balls out of air drying Fimo and polymer clay ones too and put them in the glass bottles. Then I had a brain wave, what if I added epoxy resin to the mix to create glass jars with eyeballs in but to have the look of there being liquid/juice in the jar too?
So I head off to the pound shop to buy some 2 part epoxy resin to have a go at it. How did it go?..... Well that's why I'm blogging! It went pretty badly for a first try and I now realize that you get what you pay for and there are loads of different resins out there to try, that all act slightly differently depending on what you need them to do all with different effects, viscosity and setting times. I was now in a bit over my head to be perfectly honest.
So after a bit more research I found out that I would probably need a "water clear" 2 part resin That I can get in many different places inc ebay (which is my favorite place to shop) and it's not going break the bank either! Which is always good! I haven't bought any yet, as I have asked for some advice on the craft forum I go to from those who use resin allot to see if they agree with the research I found out or can tell me the best resin to try.
Back to the pound shop stuff.....
The pound shop 2 part epoxy resin glue that I first tried, set way too quickly and had lots of bubbles and cracks in the finished product and at the end of the day dried to a lovely snot green colour. NOT what I wanted or was intending.
If I learnt anything out of this experiment, it's not to give up and some times your crafting ideas end up all trial and error to get the desired finished product.
I have taken some snap shots for your viewing pleasure of my total failure of my first attempt at this. So many craft blogs I have been to make everything look so perfect and simple to do with no mistakes. Well I have decided to post my wrong'uns here as well the perfected pieces, once I have got there, after the trials and tribulations of getting it bang on.
So here we are, the WRONG WAY TO DO THIS!!...........

I will be posting up pics when I perfect it or if I have any other total mess ups!!
I have now found out, bought and tried with a much better resin and it turned out ok, well 100 times better than this above any hoo. I'm being a bit rubbish and I have no pics yet of the better version. Although I did find out that air drying Fimo eyeballs float in resin, DOH!! So I will have to make them out of normal Fimo instead to make it work.
Note to self.... a bit of agitation goes allllong way when using resin, and I need to find a better way to measure it out too, as I ended up wasting LOADS of resin that started to cure before I used it.
I ended up making an ugly paper weight with what was left!! Yuk! (pics to come) To find out about the different types of resin go check Here it's the simplest guide I have found so far. I ended up buying 500ml Polyester resin from ebay for around £10 and it worked ok, It has a pot life of around 20-30 mins so it's just about long enough to get your stuff together pour or syringe your chosen piece!
It's now 2 months on from when I bought the "good" resin and I have had a tinker with that too now. Still not perfected embedding polymer clay into it yet, for some strange reason the polymer clay piece ends up with like an air bubble around the whole piece. Not tiny air bubbles in the resin but one big bubble around the polymer clay. It works quite well for the mermaid fetus but for the human one it looks a bit strange. I took these pics to show you but they don't look so bad through the eyes of the camera? The eyeball picture shows the same thing.

I have tried dropping the piece straight into the resin and agitating it- Nope that didn't help. I have tried dipping it in the resin before embedding it. This time trying a 2 part pour with it too. - Nope, still ended up with a bubble all around it. :/
Then after a bit more reading random resin sites I found that I could try dipping it in UNcatalyzed resin, so dip it before you put the hardener in. So I will try that next to see if that helps. If that doenst work I have 2 more things to try before I start having to ask professional resin users what this total noob is doing wrong.
I would try doing it in a 3 part pour, risky, especially if I decide to tint the resin too there's no guarantee I will get the tint the same colour as it's all guess work when it comes to adding the pigment. Oh while I'm talking about the pigment I read you should add the pigment BEFORE you add the hardener too so I will be doing that next time.
If none of that works I'm going to try another Resin to see if that will combat the air bubble problem. Maybe a different "brand" might work better??
I have some more fails to show you too. I saw on video on how to make fake opals using resin and Mylar glitter flakes. The lady in the vid used a paint pallet with the lil dips in to mix paint. So my thinking was Yay! I don't want to pay for the expensive resin molds so I'll try that. So off to the works to get some 80p paint pallets.


Boy was I wrong again! I didn't use any release agent as I didn't think I'd need any,but I should have done I couldn't get the cabochons out of the mold and I ended up breaking the pallets to get them out and when they did they were all misty/rough, not all shiny like I wanted. :(
So time to bite the bullet and buy some real resin molds. Which I did, from a very useful and very reasonably priced website you can find here. They turned up the next day. No need for release agents either, as the molds are flexible and you can pop them out just like ice out of an ice cube tray.
Finally here's a pic of something I got just right! For once I managed to pull it off without a hitch!! Can I get a woop woop!!


So far I haven't had any of the "not drying/curing fully" problems that so many have had, I definitely recommend following the instructions it comes with, to the letter.
I have decided to put up a list of all the supplies I have for resin creations so you can use it as a check list if you like?
Resin 500ml
Hardener catalyst 30ml
10ml syringe (no needle)
Rubber/latex gloves.
Non stick craft sheet or plastic bag to work on.
Wooden tongue depressors for stirring
60ml measuring cups.
Toothpicks/plastic lolly pop sticks for stirring and adding pigment.
Bottle of acetone for clean up.
Bottle of Isopropyl Alcohol also for clean up.
Face mask.
Small fan (for extra ventilation in my craft room.)
Transparent Pigment 100g Magenta and Sea Green.
Molds 16 and 25 cabochons.
Very cheap tweezers to use for embedding things.
Cling film or box lid to put over your curing project.
I also have a couple of desk lamps I leave switched on the project while it's curing, for a bit of extra heat, it seems to help it cure better with the extra warmth.
After that you just need some things to embed and some time and patience.
10 March 2013
I'm gonna start blogging!
Ok, finally dragging myself to do something I probably should have a long time ago!
I going to do a blog, a crafting blog, with what ever it is I decide to make next, including "How to's" on some of the projects.
I confess I'm not very good at checking in every day and posting loads, but, I like to craft and I would like to share how I craft with those who are interested.
Any way's on with the crafting!!
Subscribe to:
Comments (Atom)